CONCRETE BASE INSTALLATION
How To Install Your Cambridge Pavingstones System Concrete Base Installation
Step 1. Preparation: Sketch a diagram of area to be paved. Square off a 90-degree corner. Set stakes for outside perimeters 6 inches away from area. Establish finished height and slope by setting leveled string lines. Allow 1-inch drop every 8 feet at sides for water runoff.
Step 2. Excavation: Excavate (7 1/2 inches for patios and walkways/11 1/4 inches for driveways).
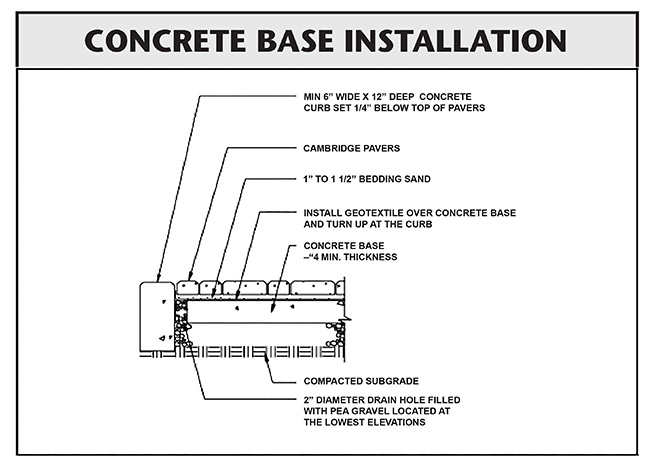
Step 3. Base: Pour concrete slab (4" for patios and walkways / 8" for driveways).
Step 4. Base Drainage: drill 2" diameter drain holes (weepholes) filled with pea gravel located at the lowest elevations. The amount of weepholes depend on the size of the project. Install Geotextile over concrete base and turn up at the curb.
Step 5. Edging: Install your fixed edge restraint of concrete or Belgium block curbing.
Step 6. Placing (Screeding) Sand: Add coarse C-33 sand and smooth out to a uniform 1 inch.
Step 7. Pavers: Place Cambridge Pavingstones on the smooth sand in the desired pattern making sure joint lines are straight. A built-in spacer bar assures consistent joint width.
Step 8. Cutting: Using a stone cutter or masonry saw, cut pavers where necessary to fit.
Step 9. Compacting: With two passes of a plate compactor, seat the pavers by forcing sand up into the joints.
Step 10. Sweeping/Final Compaction: Sweep additional sand into joints, compact again and repeat until all joints are filled.
Special Notes:
Note 1. Base thickness varies with traffic, climate, and sub grade conditionsNote 2. Concrete curbs do not deflect to the same depth as Cambridge Pavers or existing asphalt. This detail is not recommend for other than low volume residential streets.